Configuring Wake-On-LAN
Sometimes it’s the little improvements in your workflow that give you the most satisfaction and you wonder why you hadn’t made the change earlier. For me, configuring Wake-On-LAN (WOL) on my desktop PC has been one of those improvements.
It allows me to boot my PC on a schedule during weekdays and there are many mobile apps that allow you to send the wake command from your phone.
1. Receiving the Wake Command (BIOS)
Some motherboards have a BIOS setting for enabling Wake-On-LAN. You can look for it under names such as Resume on LAN, Wake-On-LAN, WOL, Power Management or similar. However, it is also possible that your motherboard doesn’t have a setting for this. In that case it’s either not supported or it’s always enabled. You will find out more soon enough, but you could also check your motherboard manufacturer’s manual.
The next step is going to be specific to your operating system. I will describe my experience with Windows. If you use Linux or macOS, there are handy guides for those elsewhere on the internet. (Jump to step 3 in that case)
2. Receiving the Wake Command (Windows)
The first step is to configure your network adapter. Just go to the Device Manager (Win+X then M, or run devmgmt.msc) and choose the network adapter that you use for your network connection (usually Realtek or Intel).
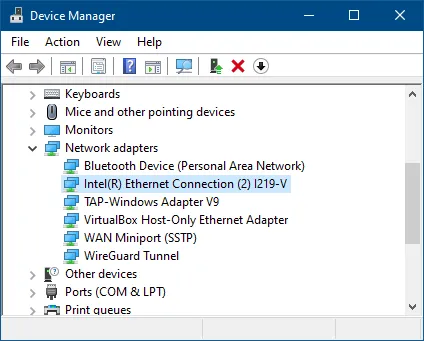
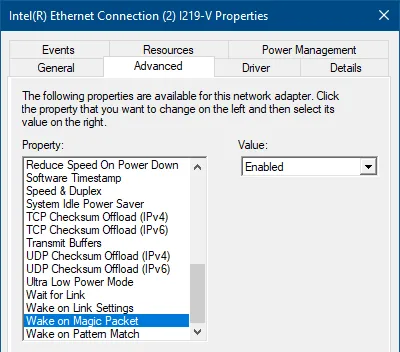
Double-click the network adapter and go to the Advanced tab. Here you have a list of settings for the driver. The one we are interested in is called Wake on Magic Packet near the bottom of the list. This needs to be set to Enabled.
Next, you need to go to the Power Management tab and tick Allow this device to wake up the computer.

Now that this is enabled, you should hopefully be able to start the PC with a WOL packet. But if it still doesn’t work, there may be one more thing you can try.
I have an Asus motherboard with a network chip from Intel. Most people probably install the network driver that is provided by the OEM’s website in the downloads section of their motherboard/computer. I originally had the Asus-provided driver installed, but apparently Asus decided it was a good idea to break the WOL feature on the Intel driver. This is rather confusing because I had no idea the OEMs even customise Intel’s drivers.
What I had to do was to go to Intel’s driver page and download an unmodified version of the network driver.
Once I had the correct driver installed, the WOL feature started working immediately, but it’s a good idea to make sure the driver installation did not reset the settings in the device manager.
Now you should be good to go for receiving the WOL packets.
3. Finding the Network Adapter’s MAC Address
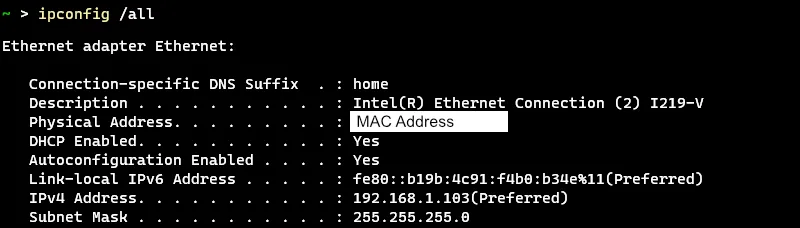
The next step is to figure out the MAC address of your network adapter. On Windows you can do it with the command ipconfig /all.
Look for the Physical Address field on the adapter whose Description matches the name of your adapter:
On Linux and macOS, it works quite similar with the command ifconfig.
4. Finding the Network’s Broadcast Address
Now the only thing left to do is to find the broadcast address of your network. It is defined as the last IPv4 address in your subnet. So you can easily derive it from your IP address and subnet mask.
If your IP address is 192.168.1.3 and your subnet mask is 255.255.255.0 then your broadcast address is 192.168.1.255.
5. Sending the Wake Command
On iOS there is an app called Wake Me Up which can send the “magic” network packet. This app is nice because it integrates with Apple’s Shortcuts app, which means you can also send a WOL command in a shortcut.

On other systems like a Raspberry Pi or a NAS server I use this little Python script which I call wake.py:
#!/usr/bin/env python
import socket

mac = '\xAA\xBB\xCC\xDD\xEE\xFF' # Replace this with your MAC address
broadcast_ip = '192.168.1.255'   # Replace this with your broadcast address
port = 9

sock = socket.socket(socket.AF_INET, socket.SOCK_DGRAM)
sock.setsockopt(socket.SOL_SOCKET, socket.SO_BROADCAST, 1)
sock.sendto('\xFF' * 6 + mac * 16, (broadcast_ip, port))
Of course, this script needs to be customised with the addresses you obtained in steps 3 and 4. Leaving the port set to 9 should be fine, but you can also try port 7 or 0.
Now you can easily run it with your system’s Python interpreter.
Final Notes
I hope these steps were enough to get you up and running with WOL. Personally, I have configured my local NAS (any server will do) to run the Python script every working day around 10 minutes before I start working, so I always find my PC ready to go when I am working from home. If you don’t have a server and are not looking to buy a Raspberry Pi, you might be able to get some use out Personal Automations in the Apple Shortcuts app, which can trigger an automation whenever you turn off your phone’s alarm. Since iOS 14 you can even create automations that run fully in the background (turn off Ask Before Running when creating the automation).
Please let me know if you know anything else that should be mentioned in this article. Just send me an email at contact@jannesmeyer.com.